How to Stain a Wooden Deck: Your Ultimate Guide to a Beautiful and Long-lasting Deck
Hi there, deck enthusiasts! I’m DeckMaster DIY, your go-to expert for all things deck-related. If you’ve been staring at your wooden deck and thinking it needs a fresh coat of stain, you’re in the right place! 👋
Why stain a deck?
Staining your deck is more than just a weekend chore. It’s an opportunity to:
- 🛡 Protect the wood from harsh weather
- 🎨 Enhance the natural grain of your wood
- 💰 Increase the value of your home
Whether you’re a complete beginner or a seasoned DIYer, this guide will walk you through the entire process of staining a deck, step-by-step.
DeckMaster’s Tip: Make sure you check the weather before you start staining. You don’t want to stain a deck and then have it rain cats and dogs!
Choosing the Right Deck Stain
When it comes to stain a deck, choosing the right stain is crucial. The stain you pick will determine not just the color of your deck, but also how well it’s protected from the elements.
Types of Deck Stains
There are two main types of stains to consider:
- Oil-Based Stain: Known for their durability, oil-based stains are great for decks that face harsh weather conditions. They’re excellent at repelling water and resisting fading.
- 📌 Note: Oil-based stains take longer to dry, sometimes up to 48 hours.
- Water-Based Stain: These are more eco-friendly and dry faster. They are also easier to clean up—you’ll just need soap and water.
- 💡 Quick Tip: If you’re staining your deck for the first time, a water-based stain is generally easier to work with.
| Type of Stain | Drying Time | Durability | Ease of Cleanup | Eco-Friendly |
|---|---|---|---|---|
| Oil-Based | 48 hours | High | Requires solvent | No |
| Water-Based | 2-4 hours | Medium | Soap and water | Yes |

Oil-Based: 45% of homeowners prefer using oil-based stains for their durability and finish.
Water-Based: 35% opt for water-based stains, which are easier to clean up and eco-friendly.
Hybrid: 15% use hybrid stains that combine the best features of both oil-based and water-based options.
Other: 5% use other types of stains or sealers for their decks.
What to Consider
- Durability: How long do you want the stain to last? Some stains offer a longer lifespan than others.
- Budget: Deck stains vary in price. Generally, you can expect to pay between $40 to $75 per gallon for water-based stains, and $25 to $45 for oil-based ones.
- Ease of Application: Some stains are easier to apply than others. If you’re new to this, look for a stain that’s beginner-friendly.
- Finish: Do you want a glossy or matte finish? The type of finish can impact the overall look of your deck.
DeckMaster’s Pro Tip: Don’t just go by what the label promises. Always do a patch test to ensure you’re happy with the color and finish.
Stain Colors and Opacity
Stains come in various opacities:
- Toner: Barely changes the color but offers basic protection.
- Semi-Transparent: Adds color but lets the wood grain show through.
- Semi-Opaque: Offers deeper color but hides the wood grain.
- Opaque: Provides solid color and maximum protection.
So, there you have it! Choosing the right stain for your deck is the first crucial step in this journey. Up next, we’ll tackle how to prepare your deck for staining.
Prepping Your Deck for Staining: The Make-or-Break Step
Before you even pop open that can of stain, there’s some essential groundwork (or should I say, deckwork?) to cover. Preparing your deck is crucial for ensuring the stain adheres properly and lasts longer.
| Step | Tools Needed | Tips |
|---|---|---|
| Sweep | Broom | Remove all loose debris |
| Wash | Deck cleaner | Use a scrub brush |
| Sand | Sandpaper | Use medium-grit |
| Dry | N/A | Wait at least 48 hours |
Cleaning the Deck
- Sweep the Deck: Remove any leaves, dirt, and debris. A clean surface is essential for the stain to adhere properly.
- Wash the Deck: Use a deck cleaner and a scrub brush to thoroughly clean the wood surface.
- 📌 Note: Some deck cleaners also act as strippers to remove old paint or stain.
- Pressure Washing: For deeper cleaning, consider using a pressure washer. It can remove stubborn grime and prepare the wood pores to absorb the stain.
- 💡 Quick Tip: Keep the pressure washer nozzle at least 8 inches away from the deck surface to avoid damaging the wood.
Sanding the Deck
If your deck has rough patches or old, peeling stains, you’ll need to sand it down. Sanding smooths the wood surface and helps the stain to adhere better.
- Use medium-grit sandpaper for best results.
Allow the Deck to Dry
- Once the deck is clean and sanded, let it dry completely. This usually takes about 48 hours.
- Check the moisture content of the wood to ensure it’s dry enough for staining. A moisture meter can be very handy for this.
DeckMaster’s Pro Tip: Don’t rush this step! Staining a wet deck will prevent the stain from adhering properly, leading to a blotchy appearance.
Cover and Tape
- Use a drop cloth to protect any areas you don’t want to stain, like siding or plants around your deck.
- Tape off the railing or walls adjacent to your deck to avoid accidental staining.
So, there’s your game plan for prepping your deck for staining. It might seem like a lot, but trust me, putting in the effort now will pay off in the long run.
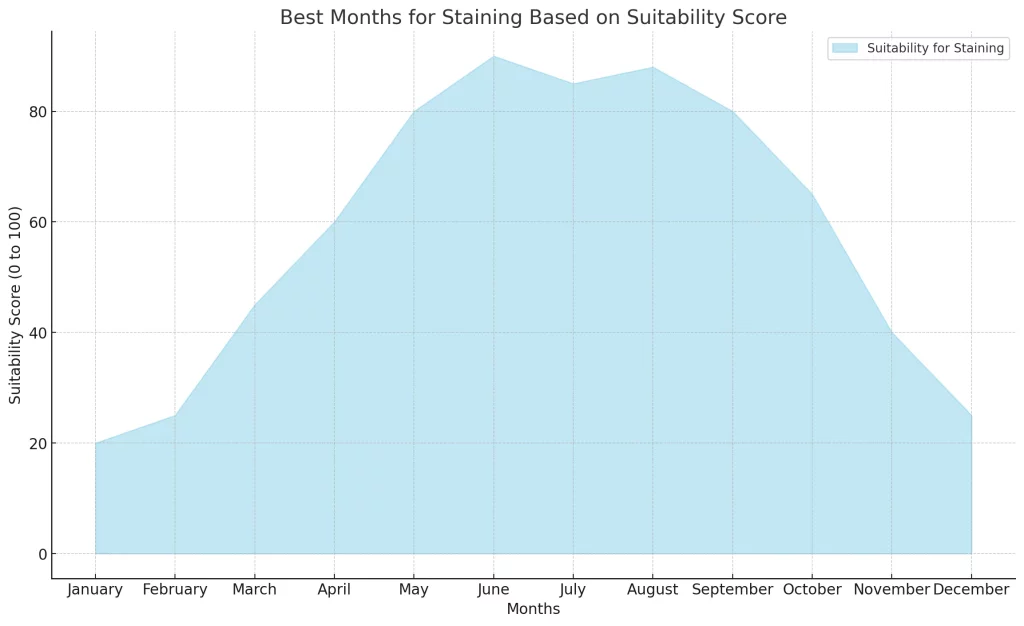
Best and worst times to stain a deck
| Season | Pros | Cons |
|---|---|---|
| Spring | Mild weather | Possible rain |
| Summer | Plenty of sunlight for drying | Too hot; stain may dry too fast |
| Fall | Cooler temperature | Leaves falling may disrupt work |
| Winter | Fewer outdoor activities | Too cold for stain to set |
The Staining Process: Time to Bring Your Deck to Life
Now comes the most rewarding part—applying the stain. By now, your deck should be clean, sanded, and fully dry. Let’s dive in!
Gather Your Tools
First things first, gather all the tools you’ll need. This usually includes:
- Paint pad or paint roller
- Paint tray
- Sprayer for larger areas (optional)
- Paintbrush for intricate areas and edges
- Rubber gloves
- Stir stick
Step-by-Step: How to Apply the Stain
Step 1: Stir the Stain
- Stir the stain well to make sure the color is mixed evenly.
Step 2: Test a Small Area
- Apply a small amount of stain in an inconspicuous area to make sure you’re happy with the color and opacity.
Step 3: Start with the Railings
- If your deck has railings, it’s a good idea to start staining them first. Use a paintbrush to reach into intricate areas.
Step 4: Move to the Deck Boards
- Use a paint pad or a roller to apply an even coat of stain to the deck boards.
- 💡 Quick Tip: Always maintain a wet edge to avoid lap marks.
Step 5: Brushing
- After you’ve rolled on the stain, use a paintbrush to push the stain into the wood grain and knots for a more uniform finish.
Step 6: Apply a Second Coat
- Once the first coat has dried, assess if you need a second coat for better color or protection.
DeckMaster’s Pro Tip: Always check the drying time on your specific stain. Some water-based stains dry in as little as 2 hours, while oil-based stains might require up to 48 hours.
Final Checks
- Once you’ve applied the wood stain, give it ample time to dry.
- Check for any missed spots or uneven areas and touch them up.
Voilà! You’ve successfully stained your deck. Trust me, your outdoor space will thank you for it.
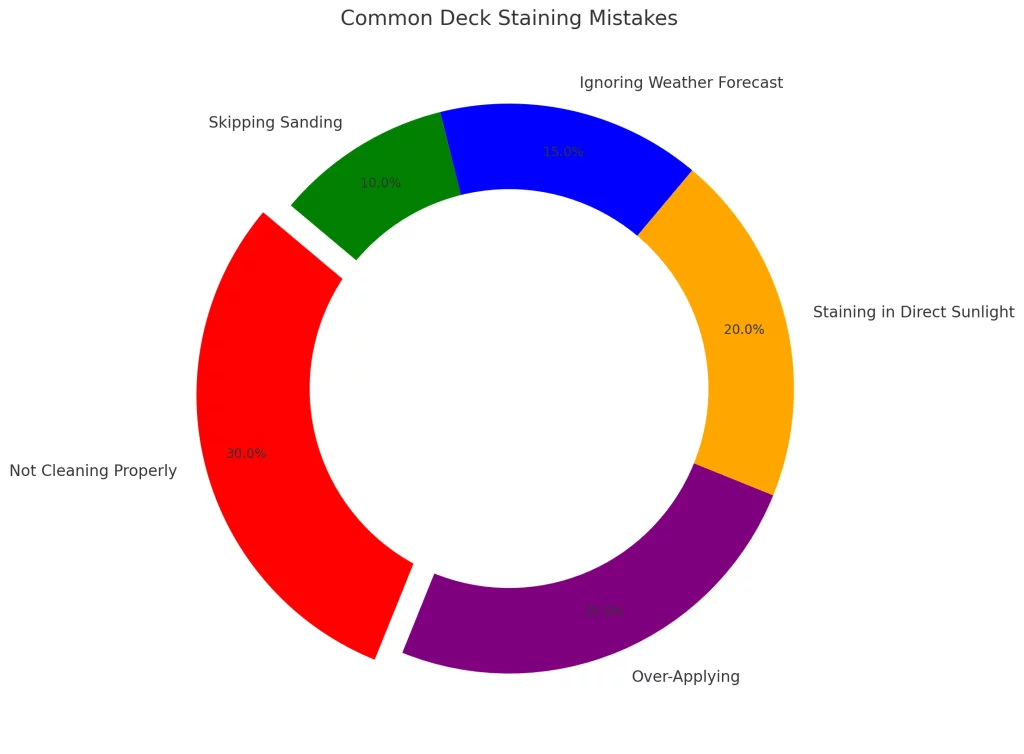
Not Cleaning Properly: 30% of mistakes are due to not cleaning the deck adequately before staining.
Over-Applying: 25% of errors occur when too much stain is applied, leading to poor adhesion and peeling.
Staining in Direct Sunlight: 20% of people make the mistake of staining in direct sunlight, which can cause the stain to dry too quickly.
Ignoring Weather Forecast: 15% don’t check the weather, leading to rain or dew ruining the freshly applied stain.
Skipping Sanding: 10% skip the sanding process, which is crucial for better stain adhesion.
Aftercare and Maintenance: Keep Your Deck Looking Brand New
Congratulations, you’ve successfully stained your deck! But the journey doesn’t end here. Proper aftercare and maintenance are essential for prolonging the life of your stain and, by extension, your deck.
| Maintenance Task | Frequency | Notes |
|---|---|---|
| Sweep | Weekly | Remove leaves and dirt |
| Wash | Monthly | Mild soap and water |
| Reapply Stain | Every 2-5 years | Check for wear and tear |
Regular Cleaning
- Sweep the Deck: Make it a habit to sweep the deck regularly to remove leaves, dirt, and other debris.
- Wash the Deck: A mild soap and water usually suffice for general cleaning. For tougher stains, you might need a specialized deck cleaner.
DeckMaster’s Pro Tip: Avoid using a pressure washer for regular cleaning as it can strip off the stain over time.
Reapplication and Touch-Ups
- When to Reapply: Depending on the type of stain you used and your local weather conditions, you’ll need to re-stain your deck every 2 to 5 years.
- Touch-Ups: If you notice any areas where the stain has faded or worn away, you can touch them up without having to re-stain the entire deck.
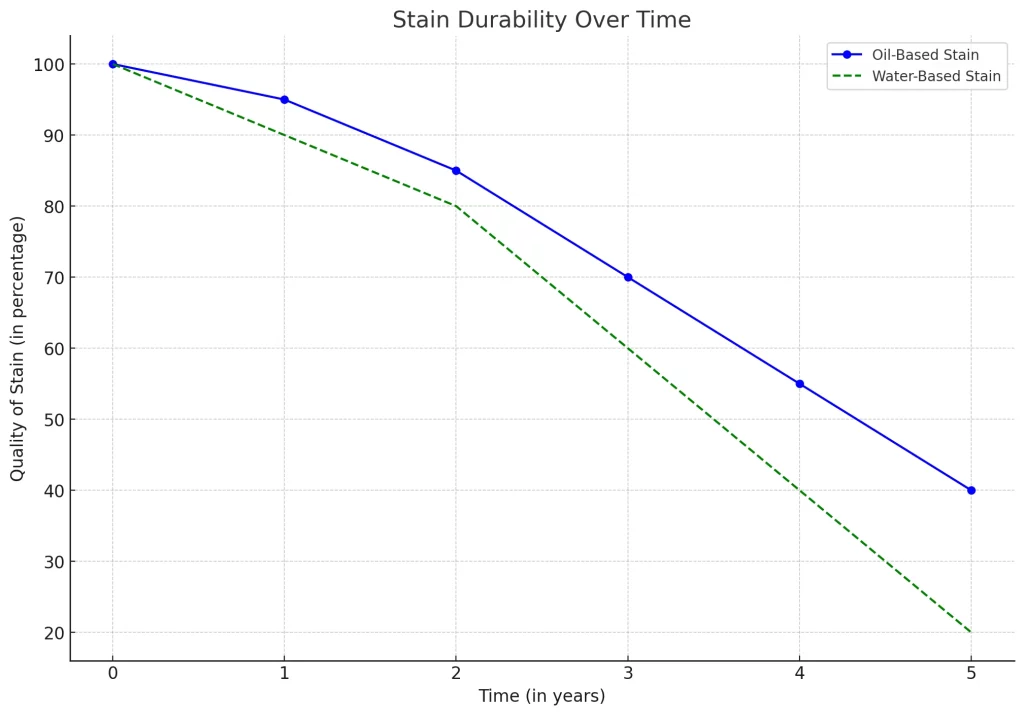
Oil-Based Stain: Starts at 100% quality and gradually degrades to around 40% by the end of the 5th year.
Water-Based Stain: Also starts at 100%, but degrades more quickly, dropping to around 20% quality by the end of the 5th year.
Winter Care
- If you’re in a region with harsh winters, consider using a sealer before the first snowfall to add an extra layer of protection.
Inspect Regularly
- Take the time to inspect your deck at least once a year. Look out for any signs of rotting, mildew, or structural issues.
Certainly! Since we’ve covered all the main sections of the blog post, let’s round it off with a concluding summary and a call-to-action to engage the readers further.
Wrapping It Up: Your Deck, Your Pride
Congratulations on making it to the end of this guide! By now, you should be fully equipped to take on the task of staining your wooden deck. From preparation to application and aftercare, you now have all the tips and tricks up your sleeve to make your deck the envy of the neighborhood.
Remember, a well-stained deck not only enhances the beauty of your outdoor space but also extends the life of your wood deck, giving you more years to enjoy those summer BBQs and sunset viewings.
What’s Next?
- Want more deck ideas? Stay tuned for our upcoming blog posts on creative deck designs and eco-friendly options.
- Have questions or want to share your deck staining experience? Drop a comment below or reach out to us on social media. We’d love to hear from you!
DeckMaster’s Final Tip: Always keep an eye on your deck’s condition. Regular maintenance is the key to a long-lasting, beautiful deck.