How to Use a Miter Saw: A Step-by-Step Guide
Ever stared at a perfectly angled picture frame or flawlessly built bookshelf and wondered how they achieved those precise bevels? That, my friend, is the handiwork of a miter saw! Whether you’re working with large workpieces or smaller boards, a miter saw can help you achieve those perfect angles in inches.
I’m Max Woodsmith, and I’ve been a carpenter for over 15 years. Let me tell you, a miter saw is like a best friend in my workshop. Using a standard miter saw with a laser and miter gauge helps me achieve those crisp, clean cuts for my trim work. It impresses my clients and adds a professional touch to my DIY projects.
But here’s the thing: a miter saw is a powerful tool that can effortlessly cut through various workpieces and materials, making it a must-have for any user. And like any powerful tool, you’ve got to know how to safely and effectively use the miter gauge on your workpiece. That’s where this guide comes in.
Are you a DIY newbie excited to start your first project? Don’t forget to use a miter gauge to ensure accurate cuts on your workpiece. Don’t forget to use a miter gauge to ensure accurate cuts on your workpiece. Or maybe you’re a seasoned pro looking for some new tips? Either way, this guide is for you. I’ll walk you through everything you need to know about using a power miter saw on a workpiece, step by step.
So, are you ready to dive in? By the end of this guide, you’ll be cutting wood like a pro. Let’s get started!
What is a Miter Saw?
So, what exactly is a miter saw? In simple terms, it’s a special kind of saw that lets you make precise cuts at various angles. Imagine you’re building a picture frame. You need the corners to fit just right, right? That’s where a miter saw comes in handy. It’s designed to make those angled cuts super easy and super accurate. They are designed to make angled cuts for moulding, trim work, rafters and other general carpentry applications.
Different Types of Miter Saw
Now, not all miter saws are created equal. There are a few types you should know about:
- Standard Miter Saw: This is your basic model. It’s great for making straight cuts and angled cuts, but that’s about it. Perfect for beginners!
- Compound Miter Saw: This one’s a bit fancier. It can tilt in different directions, allowing you to make beveled cuts. Think of it as the Swiss Army knife of miter saws.
- Sliding Compound Miter Saw: This is the big kahuna! It does everything the compound miter saw does but also slides back and forth. This means you can cut wider pieces of wood. Sliding miter saw’s a bit more advanced but super versatile.
| Feature | Standard Miter Saw | Compound Miter Saw | Sliding Compound Miter Saw |
|---|---|---|---|
| Cutting Angles | Horizontal only | Horizontal and Vertical | Horizontal, Vertical, and Slide |
| Versatility | Basic | Moderate | High |
| Bevel Cuts | No | Yes | Yes |
| Price Range | Low | Moderate | High |
| Ease of Use | Easy | Moderate | Advanced |
| Cutting Width | Limited | Limited | Extended |
| Portability | High | Moderate | Low |
| Best For | Straight and angled cuts | Angled and beveled cuts | Wide, angled, and beveled cuts |
| Common Applications | Trim work, framing | Crown molding, trim work | Large boards, extensive projects |
Key Parts and Setup of a Miter Saw
Understanding the anatomy of your miter saw is the first step toward mastering it. Each part has a specific function that contributes to both the safety and precision of your cuts. Let’s break it down:

- Blade: This is the star of the show. It’s what cuts through wood, MDF, plywood, or other materials. Make sure it’s sharp and appropriate for the material you’re cutting.
- Blade Guard: Think of this as your safety net. It protects you from accidental contact with the blade and retracts automatically when you make a cut.
- Trigger Handle: This is your control center. The trigger handle allows you to start and stop the saw, as well as lower the blade, giving you full control over every aspect of the cutting process.
- Saw Fence: Your fence is your guide, often used in conjunction with a hold-down clamp to secure your material. It provides a 90-degree surface for precise and consistent cuts.
- Bevel Scale and Adjustment: Want to get fancy with some angled cuts? The bevel scale and adjustment knob let you tilt the blade to the exact angle you need.
- Miter Adjustment: This feature allows you to change the angle of the blade horizontally, offering even more versatility in your cuts.
- Alignment: Before you make any cuts, triple-check that your blade, fence, and workpiece are perfectly aligned. This is the cornerstone of precision.
- Dust Collection Port: Sawdust isn’t just messy; it can also be a safety hazard. The dust collection port helps keep your workspace clean.
- Slide Rails/Arm: For those longer cuts, the slide rails or arm allow the saw to move back and forth, extending your cutting range.
Why Use a Miter Saw?
Alright, so we’ve talked about what a miter saw is. But you might be wondering, “Why should I use one? What makes it so special?”

Advantages Over Other Saws
First off, let’s talk about why a miter saw beats other saws in certain areas:
- Precision: If you’re looking for cuts that are spot-on, a miter saw is your best bet. It’s built for accuracy.
- Speed: Need to make a lot of cuts fast? A miter saw can zip through wood like a hot knife through butter.
- Versatility: From straight cuts to angled and beveled cuts, this saw can do it all. It’s like the multi-tool of saws!
- Safety: With its design and features, a miter saw is generally safer to use compared to other saws, as long as you follow the rules.
| Feature | Miter Saw | Circular Saw | Table Saw | Jigsaw |
|---|---|---|---|---|
| Precision | High precision for angle cuts. | Moderate precision. | High precision for straight cuts. | Moderate to low precision. |
| Cut Types | Miter, bevel, compound, crosscuts. | Crosscuts, rip cuts. | Rip cuts, crosscuts, dado cuts. | Curved and straight cuts. |
| Ease of Use | Moderate. Requires some skill for precise angles. | Easy for simple cuts. | Complex setup. Requires skill for precision. | Easy for simple cuts. |
| Portability | Generally stationary. Some smaller models are portable. | Highly portable. | Stationary, heavy. | Highly portable. |
| Safety | Guard and fence provide good safety. | Blade exposed, requires careful handling. | Safety features like riving knife, but exposed blade. | Blade is partially covered, but still exposed. |
| Workpiece Size | Limited by blade and fence size. | Limited by blade size, but can be used on large panels. | Large workpiece can be accommodated. | Limited by blade length. |
| Cost | Moderate to high. | Low to moderate. | Moderate to high. | Low to moderate. |
| Dust Collection | Generally good with dust bags. | Moderate, some models have ports. | Good with accessories. | Generally poor. |
| Versatility | Specialized for angle cuts. | General-purpose for straight cuts. | Highly versatile with various blades and jigs. | Versatile for curved and intricate cuts. |
Ideal Projects for Using a Miter Saw
So, when should you whip out your miter saw? Here are some ideal projects:

Framing: 20%
Crown Molding: 15%
Baseboards: 10%
Cross Cuts: 25%
Furniture Making: 20%
Other: 10%
- Picture Frames: Want those corners to meet perfectly? A miter saw makes it easy.
- Baseboards and Crown Molding: If you’re looking to spruce up your home, this saw helps you cut those tricky angles.
- Furniture Building: From chairs to tables, a miter saw can help you get those cuts just right.
- Deck Building: Need to cut a bunch of boards to the same length? Line ’em up and let the miter saw do its thing.
So there you have it! Whether you’re a DIY newbie or a crafting veteran, a miter saw is a fantastic tool to have in your arsenal. Stay tuned as we dive deeper into how to use this amazing tool!
Miter Saw Safety Tips : Precautions and Gear
Hey, safety should never take a backseat, especially when you’re dealing with powerful tools like a miter saw. So let’s get into it!

Safety Gear Needed
Before you even think about making your first cut, make sure you’re geared up:
- Safety Glasses: Protect those peepers, folks!
- Ear Protection: These saws can get loud, so keep those ears safe.
- Dust Mask: Trust me, you don’t want to be breathing in wood dust.
- Gloves: A good pair can give you a better grip and some added protection.
Safety Tips and Precautions
- Read the Manual: It might not be the most exciting read, but it’s packed with vital information tailored to your specific miter saw model. Don’t skip it!
- Gear Up: Your eyes and ears are irreplaceable. Always wear safety glasses and hearing protection. It’s a small step that can save you from big problems.
- Check the Saw: Before you power up, give your saw a once-over. Ensure everything’s secure and in its right place. A loose bolt or part can spell disaster.
- Mind Your Hands: Always be aware of where your hands are. Keep them away from the blade, and remember to tuck in the thumb of your support hand. It’s a simple habit that can prevent nasty accidents.
- Use Clamps for Small Pieces: If you’re cutting a small piece, clamp it down. This not only ensures a precise cut but also keeps your fingers safe.
- Stay Sharp and Clean: A sharp, clean blade isn’t just efficient—it’s safer. You won’t need to force it, reducing the risk of slips or jams.
- Support Your Work: Make sure the material you’re cutting is well-supported on both sides of the blade. This prevents any unexpected drops or movements post-cut.
- Wait for the Blade: After making a cut, release the trigger and wait for the blade to come to a complete stop before lifting the saw.
- Unplug Before Adjusting: Whether you’re changing the blade or checking the arbor, always unplug the saw first. It’s a simple step that ensures the saw won’t accidentally start.
- Guard the Blade: The blade guard is there for a reason. Never remove it. It’s a crucial barrier between you and the blade.
- Be Mindful of Fences: If you’re cutting bevels, ensure any removable fences are out of the way. This ensures a smooth, safe cut.
- Stay Focused: This isn’t a task you can do on autopilot. Keep your eyes on the saw, your mind on the task, and any distractions at bay.

Tools and Materials Required For Miter Cut
Alright, folks, before we dive into the nitty-gritty of using a miter saw, let’s make sure we’ve got all our ducks in a row. You wouldn’t bake a cake without all the ingredients, right? The same goes for woodworking.
List of Tools
First up, let’s talk tools. Besides your miter saw, here’s what you’ll need:
- Tape Measure: Precision is key, and a good tape measure will be your best friend.
- Carpenter’s Pencil: For marking those cuts before you make ’em.
- Clamps: To hold down your wood securely while you cut.
- Level: To make sure everything’s straight and even.
- Sawhorses: These will give you a stable surface to work on.
List of Materials
Now, what about the stuff you’ll be cutting? Here’s a quick list:
- Wood: Obvious, I know. But make sure you pick the right type for your project.
- Screws or Nails: To piece everything together after you’ve made your cuts.
- Wood Glue: For added strength in those joints.
- Sandpaper: To smooth out any rough edges.
- Paint or Stain: To give your project that finishing touch.
So, there you have it! A quick checklist to make sure you’re all set to start using your miter saw like a pro. Up next, we’ll get into setting up your miter saw for the first time. Stay tuned!
Setting Up Your Miter Saw
So, you’ve got your miter saw and all your tools and materials ready. Awesome! But before we start cutting, let’s make sure your miter saw is set up just right. Trust me, a well-set-up saw is the secret to those perfect cuts.
Unboxing and Initial Setup
- Unbox Carefully: Take your miter saw out of the box and lay out all the parts. Make sure nothing’s missing.
- Place on a Stable Surface: Use those sawhorses or a sturdy table. Stability is key.
- Attach the Blade: If your saw came without the blade attached, now’s the time to put it on. Follow the manual!
Calibration and Adjustments
- Check the Angles: Use your level to make sure the saw is perfectly horizontal and vertical.
- Test Cuts: Make a few test cuts on scrap wood to see if any adjustments are needed.
- Tighten Everything: Before you start, give all the bolts and knobs one last check. Make sure they’re tight.
- Set the Fence: This helps guide your wood as you cut. Make sure it’s straight and secure.
And there you have it! Your miter saw should now be set up and ready to go. Up next, we’ll dive into making basic cuts and how to master them. Are you excited? I know I am!
Basic Cuts with a Miter Saw
Alright, the moment we’ve all been waiting for—making those first cuts! Don’t worry, we’ll start simple and work our way up. Ready? Let’s do this!
Straight Cuts
- Mark Your Wood: Use your carpenter’s pencil to mark where you want to cut. To make a basic miter cut, unlock the miter gauge and slide it to the angle you need.
- Align the Blade: Lower the saw blade to make sure it lines up with your mark.
- Make the Cut: Hold the wood steady, start the saw, and make your cut. Easy peasy!
Cross Cuts
- Measure Twice, Cut Once: Always double-check your measurements. You can’t un-cut wood!
- Set the Fence: Make sure your wood is flush against the fence for a straight cut.
- Go for It: Start the saw and make your crosscuts. Remember, slow and steady wins the race.
See? Making basic cuts isn’t so scary. And the more you practice, the better you’ll get. Up next, we’ll tackle some more advanced cuts to really show off what your miter saw can do. Stay tuned!
Advanced Cuts
Alright, you’ve got the basics down. Now let’s kick it up a notch and get into some advanced cuts. Don’t sweat it; I’ll walk you through each one.
Miter Cuts
- Set the Angle: Use the angle guide on your saw to set the angle you need for your cut.
- Check Twice: Always double-check your angle before you cut. Better safe than sorry!
- Cut Away: Hold your wood steady and make that miter cut. You’re getting the hang of this!
- 👉 Pro Tip: Make a test cut on scrap wood first to make sure your angle is just right.
Bevel Cuts
- Tilt the Blade: For bevel cuts, you’ll need to tilt the saw blade. Check your manual for how to do this.
- Secure the Wood: Make sure your wood is clamped down tight. We don’t want any slips.
- Make the Cut: Start the saw and carefully make your bevel cut. Nice and easy does it.
- 👉 Pro Tip: Safety goggles are a must; things can get a bit “dusty” with bevel cuts.
Compound Cuts
- Set Both Angles: This is a combo of a miter and a bevel cut. Set both angles on your saw.
- Test on Scrap Wood: Always a good idea to test these tricky cuts on some scrap wood first.
- Go for It: Once you’re confident, make that compound cut. Look at you go!
- 👉 Pro Tip: Patience is key. Don’t rush; let the saw do the work.
“When you nail that perfect cut, it’s like hitting a home run—satisfying and worthy of a little end-zone dance.” 😄
And there you have it! You’re now a pro at making both basic and advanced cuts with your miter saw. Up next, we’ll go through a step-by-step guide to using your miter saw for a complete project. Can’t wait!
How does this section look? Ready to move on to the next part, or would you like to make any adjustments?
Learn How To Use Miter Saw
Okay, folks, it’s time to put all that knowledge to work. We’re going to go through a complete project from start to finish, using all the cuts we’ve learned. Are you pumped? I know I am!
Detailed Walkthrough
- Plan Your Project: Before you even touch that saw, know what you’re building. Sketch it out and list the cuts you’ll need.
- Measure and Mark: Use your tape measure and carpenter’s pencil to mark where each cut will go. Remember, measure twice, cut once!
- Set Up Your Saw: Make sure it’s calibrated and the blade is sharp. Safety gear on!
- Start with Basic Cuts: Begin your project with the simpler straight and cross cuts. Get those out of the way first.
- Move to Advanced Cuts: Once you’re warmed up, tackle those miter, bevel, and compound cuts.
- Test Fit: Before you secure anything, do a test fit to make sure everything lines up.
- Secure Your Pieces: Use screws, nails, or wood glue to put it all together.
- Finishing Touches: Sand down any rough edges and add paint or stain if you like.
- Admire Your Work: Take a step back and enjoy what you’ve created. You did that!
And that’s it! You’ve just completed a project using your miter saw from start to finish. How does it feel to be a miter saw master? Up next, we’ll talk about some common mistakes to avoid and how to keep your miter saw in tip-top shape. Stay tuned!
Common Mistakes and How to Avoid Them
Hey, we all make mistakes, but when it comes to using a miter saw, some errors can be costly—or even dangerous. Let’s go over some common mistakes and how to steer clear of them.
List of Common Errors
- Rushing the Cut: Slow down, cowboy! Rushing can lead to inaccurate cuts and is a safety risk.
- Not Securing the Wood: Always clamp down your wood. A moving piece can ruin your cut or cause an accident.
- Ignoring Safety Gear: I can’t stress this enough—always wear your safety gear!
- Not Checking the Blade: A dull or damaged blade can mess up your project and is a safety hazard.
- Skipping the Manual: Every miter saw is a bit different. Take the time to read the manual.
Common Errors Table
Below is a table that summarizes common errors people make when using a miter saw, along with tips on how to avoid them:
| Common Errors | Consequences | Tips to Avoid Them |
|---|---|---|
| Incorrect Measurements | Inaccurate cuts, wasted material | Always measure twice before cutting. Use a reliable measuring tape and carpenter’s pencil. |
| Not Wearing Safety Gear | Risk of injury | Always wear safety goggles, ear protection, and a dust mask. |
| Overloading the Motor | Motor burnout, inaccurate cuts | Don’t force the saw through the material. Let the blade do the work. |
| Using a Dull Blade | Rough cuts, increased risk of kickback | Regularly inspect and clean the blade. Replace or sharpen it as needed. |
| Not Securing the Workpiece | Inaccurate cuts, risk of kickback | Always use clamps or other securing mechanisms to hold the workpiece in place. |
| Ignoring the User Manual | Misuse of the tool, increased risk | Always read and follow the user manual, especially if you’re unfamiliar with the specific miter saw. |
| Poor Blade Alignment | Inaccurate angles and cuts | Regularly check and calibrate the blade and miter gauge for alignment. |
| Not Checking the Cutting Path | Risk of cutting into the workbench or clamps | Always make sure the cutting path is clear of obstructions. |
| Not Testing Cuts on Scrap Wood | Wasted material, rework | Always test your settings on a piece of scrap wood before making the final cut. |
| Lack of Maintenance | Reduced tool lifespan, poor performance | Regularly clean and lubricate the saw. Inspect it for any wear or damage before use. |
Tips to Avoid Them
- Take Your Time: Measure twice, cut once. And never rush.
- Use Clamps: They’re there for a reason. Use them.
- Gear Up: Safety first, always.
- Regular Checks: Before each project, give your saw and blade a quick check.
- Read Up: Spend some time with your manual. It’s your miter saw bible.
So there you have it—common mistakes and how to avoid them. Up next, we’ll talk about when NOT to use a miter saw and how to keep your tool in great shape. Stick around!
When NOT to Use a Miter Saw
Hey, I love my miter saw as much as the next guy, but there are times when it’s not the best tool for the job. Let’s go over some of those situations.
Situations Where a Miter Saw is Not Ideal
- Small, Intricate Cuts: If you’re working on a project that needs tiny, detailed cuts, a jigsaw or a coping saw might be a better fit.
- Long, Straight Cuts: Need to rip a board lengthwise? That’s a job for a table saw, not a miter saw.
- Curved Cuts: Miter saws are champs at angles, but they can’t handle curves. For that, you’ll want a band saw or a jigsaw.
- Metal or Plastic: While some miter saws can cut through soft metals or plastics, it’s generally not their strong suit. Use a specialized saw for those materials.
- Limited Space: Miter saws can be bulky. If you’re working in a tight space, you might want to consider a more compact tool.
So, there you have it. While a miter saw is a fantastic tool, it’s not a one-size-fits-all solution. Knowing when to use it—and when not to—will make you a more skilled craftsman. Up next, we’ll dive into maintenance and troubleshooting to keep your miter saw running smoothly. Stay tuned!
Maintenance and Troubleshooting
Alright, you’ve become quite the miter saw maestro, but to keep making those perfect cuts, you’ve got to take care of your tool. Let’s talk maintenance and troubleshooting.
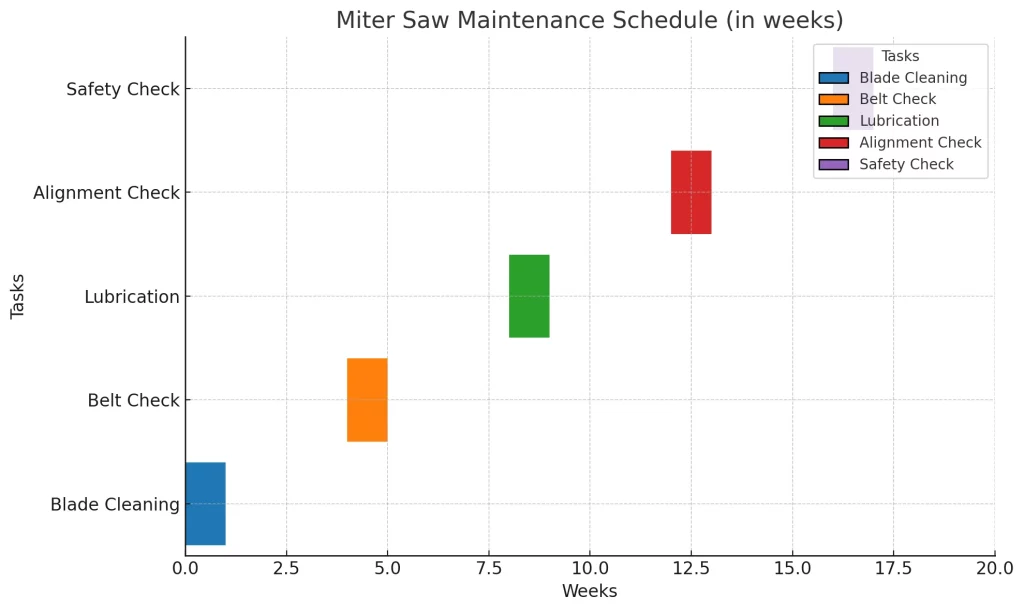
Regular Maintenance Tips
- Clean After Use: Sawdust can build up quickly. Give your saw a good wipe-down after each use.
- Check the Blade: A dull blade is a no-go. Keep it sharp and replace it when needed.
- Lubricate: Keep those moving parts smooth with regular lubrication.
- Tighten Bolts and Screws: Loose parts can lead to wobbly cuts and are a safety risk. Tighten ’em up!
- Store Properly: Keep your saw in a dry, clean place to avoid rust and damage.
Troubleshooting Common Issues
- Inaccurate Cuts: If your cuts are off, double-check your measurements and calibration. If all else fails, consult the manual.
- Saw Won’t Start: Check the power source and the safety switch. Still no luck? It might be time for a repair.
- Excessive Noise or Vibration: This could be a sign of a loose part or a dull blade. Check and fix as needed.
And there you have it! Proper maintenance and troubleshooting will keep your miter saw running like a dream for years to come. In our final section, we’ll wrap up and give you some additional resources to continue your miter saw journey. Stick around!
Wrapping Up and Additional Resources
Wow, what a journey we’ve been on! From unboxing your first miter saw to becoming a pro at making all kinds of cuts, you’ve come a long way. And I couldn’t be prouder!
Final Thoughts
- Practice Makes Perfect: The more you use your miter saw, the better you’ll get. So keep practicing!
- Safety First: Never forget the importance of safety gear and precautions. They’re not just guidelines; they’re rules.
- Keep Learning: The world of woodworking is vast. There’s always something new to learn, so stay curious!
Additional Resources
- Online Tutorials: There are tons of great videos and articles out there to help you hone your skills.
- Woodworking Classes: Consider taking a class to get some hands-on experience.
- Join a Community: There are plenty of online forums and local woodworking clubs where you can share tips and get advice.
- Books and Magazines: Old-school, I know, but there’s a wealth of knowledge in woodworking literature.
And that’s a wrap! Thanks for sticking with me through this comprehensive guide to using a miter saw. You’re well on your way to becoming a woodworking wizard. Until next time, keep those saws buzzing and those projects rolling!
![5 Best Wood Routers for Beginners [Buyer Guide 2023]](https://bestwoodrouterguru.com/wp-content/uploads/2023/05/Top-5-Wood-Routers-for-Beginners-768x402.webp)