How to install a drill press chuck?
Many of you may have this perception that installing a drill press chuck process would be similar to installing any other drill or driver chuck however this is not the case.
Removing and installing a drill press chuck includes different steps and thus you need to pay close attention to the installation process in order to fit chuck well to make it stay at its place. Drill press chucks if properly placed would fit in the tapered spindle of drill press tightly and it would stay there.
A Morse taper is used with drill presses and their chucks. This taper enables you to attach different attachments to a drill press through arbor. In this page we are going to share all the steps that would guide you for proper removing and installation of a drill press chuck.
Removing a Drill Press Chuck:
At times you may find the need of removing your drill press chuck. A drill press chuck may have bent, might be defected or dirty or not properly installed. In all such cases you would need to know how to remove, clean and install a drill press chuck. You can remove your drill press chuck in different ways and no matter what method you adopt, it won’t take more than a few moments to do the job.
Use Chuck Removal Tool:
A special chuck removal tool is included with drill press that is used for removing chuck. You will find removing chuck easier with the aid of this tool. This tool will easily fit inside the access window on drill press spindle. Follow these simple steps to remove the drill press chuck with ease:
- Insert the chuck removing tool in drill press spindle access window.
- Now hammer it lightly to advance the tool in window. As you move it farther, chuck will fall out of your drill press.
While doing this process, you should make sure that the table of your drill press is raised so that as chuck falls out it won’t get damaged.
Use Hammer:
If your drill press doesn’t include a chuck removal tool, another method could be use of a hammer and hard wood piece. While using this method for removal of drill press chuck, you need to be extra cautious. If you take proper care with this method there will be no danger of causing any damage to the tool. Follow these simple steps:
- Arrange for a hammer and a reasonably sized hard wood piece.
- Place hardwood piece at an angular position above the drill press chuck.
- With the use of hammer, now give the wood piece one or two slaps. Doing this would enable chuck to fall out.
While doing this process for removal of drill press chuck, make sure that the strike with hammer is angled downwards so that you don’t end up bending or damaging the chuck shaft or spindle.
Cleaning the Drill Press Chuck:
Before installing a drill press chuck, it is important to clean it well. There may be oil, debris or dust gathered on your chuck shaft or at the place where it fits in, so you should ensure cleaning of these areas. Use a degreasing agent with a clean rag for cleaning chuck spindle. You can make use of acetone that works fine for this purpose because of its capability of evaporating quickly. You must also clean spindle inside with few drops of acetone with a rag. Make sure that the rag or any cloth you are using is clean and lint-free. Even if you are installing a new chuck, you may not get fooled by assuming that there can be no burrs with the new chuck. Check and make sure that it doesn’t have any dirt too.
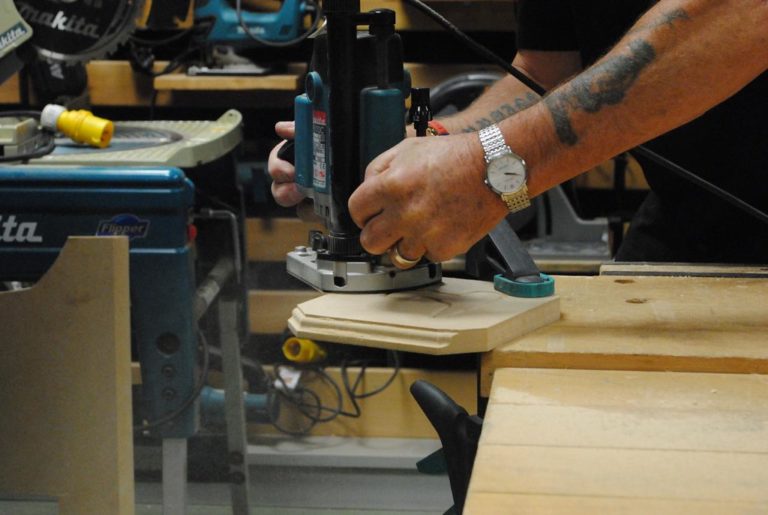
Installing the Drill Press Chuck:
Now that you have cleaned the chuck, shaft and spindle; you can restore chuck. Follow these simple steps for installation:
- Insert the drill press chuck tightly inside strong enough so that it stays at place without falling out for some time.
- Jaws of drill press must be retracted in order to prevent from causing any damage to the tool.
- Table should be lowered down in order to open up space for hammer swinging.
- With the use of a rubber/wooden mallet quickly hit the chuck bottom 2 to 3 times in order to get the installation of chuck done properly. Avoid giving a powerful blow or you may end up damaging the piece. Always make sure that it is only a firm tap in order to get the job done. Avoid hitting again and again. A clean chuck would fit in a clean spindle without giving you a hard time.
These steps would ensure that the chuck would remain at its place until you want and try to remove it.
Conclusion:
Proper installation is a vital aspect of maintaining longevity of your power tool. You need to know steps for correct installation as part of the maintenance process as well. There will be times when you would need to replace drill press chuck and this knowledge that we have shared here for removing, cleaning and replacement would be beneficial for you. So if your drill press chuck needs to be fixed, replaced or clean, you need not to visit shop of a repair technician but by following all the details mentioned here, you can do best for your selected machine.